How Samples Work
You collect the blood samples yourself, ideally on a coffee‑filter triangle. Each sample must be fully dry, placed in its own baggie, and clearly labeled with your identifier for that bird. For feather samples, see Option B down below.
~ If you’re along my route, I can also pick up samples and payments in person. Watch FB for my travel info.
Payment
- Payment must be made before you mail samples. Once Payment is made, I create a ticket for you and watch for your shipment. Mail is collected Monday, Wednesday, and Friday.
- Mailing Address
Juniper Pines Poultry Lab
306 E Main St, PMB 627
Canon City, CO 81212 - Upon arrival, I begin testing. Results are communicated within 24 – 48 hours.
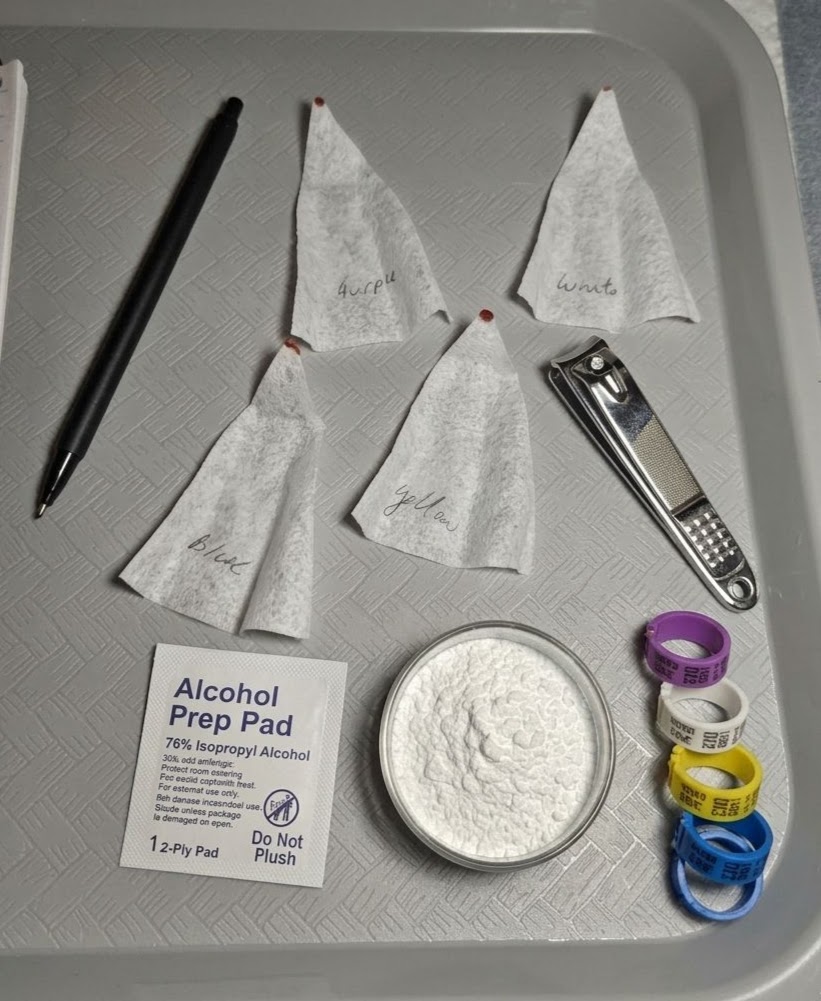
What you’ll need
- Toenail clippers
- Alcohol wipes or rubbing alcohol + cotton
- Disposable gloves
- Styptic powder or cornstarch
- Coffee filters (best option) or an index card (harder to dry)
- Your chosen chick identifier (leg band, rubber band, bracelet piece, or even “brown chick”)
- One baggie per sample
Tips: - Coffee filters work best. Cut them like a pizza into triangles—hold the wide end and collect the blood on the pointy end.
- It’s easier to write the ID on the filter before collecting the blood.
- Any ID system is fine as long as you know which chick is which and the sample is clearly marked.
Step‑by‑Step Directions
- Clean your clippers
Wipe the cutting edge with an alcohol wipe. (Don’t dunk—dunking doesn’t remove debris.) - Pick up the chick and apply its ID
Band the leg or note whatever identifier you’re using so it matches the sample. - Prep the nail
Wipe one toenail with alcohol and let it dry for a few seconds. - Clip & collect
Clip the nail short, just enough for a small drop of blood to form.
Set the clippers down, pick up your coffee‑filter triangle, and touch the tip to the drop.
You only need a spot about the size of a grain of rice—anywhere on the paper, as long as it’s not smeared or touched. I don’t need much, but in case of PCR malfunction, it’s best to have more blood available to sample.
Trick: Bend the tip of the filter upward so it stands up while drying. - Stop the bleeding
Dab the chick’s nail in cornstarch or styptic powder.
Give the chick a little kiss and return it to the brooder. - Clean up & repeat
Wipe your clippers again, make sure the sample is labeled, and move on to the next chick. - Dry & package
Once all samples are completely dry, place each one in its own ziplock baggie.
Put all baggies into a mailing envelope along with a sheet of paper containing your contact information.
Option B for older birds or other species that you don’t feel comfortable clipping toenails (Parrot, Emu, Pigeon, etc.):
Pluck 3-5 feathers from the breast or wing. Ensure the quill bulb (the tiny clear/white bump at the end) is attached. Place feathers in a small envelope and write your Bird ID on the outside. Put all baggies into a mailing envelope along with a sheet of paper containing your contact information.